Brake fluid contamination on automotive paint represents one of the most serious chemical threats to vehicle finish integrity. Unlike water-based spills that simply evaporate, brake fluid contains potent solvents and chemical compounds that can permanently damage paint systems within minutes of contact. The hygroscopic nature of most brake fluids, combined with their aggressive solvent properties, creates a perfect storm for paint deterioration that extends far beyond surface-level staining.
Modern automotive paint systems, whether single-stage or multi-stage clear coat applications, are particularly vulnerable to brake fluid damage due to the chemical compatibility between polyglycol-based fluids and automotive polymers. The financial implications of brake fluid paint damage can be substantial, with professional restoration costs ranging from £200 for minor spot repairs to over £2,000 for complete panel repainting. Understanding the immediate response protocols and long-term restoration strategies becomes essential for every vehicle owner, particularly those who perform their own automotive maintenance.
Chemical composition of brake fluid and paint interaction mechanisms
The destructive potential of brake fluid on automotive paint stems from its fundamental chemical composition and the specific interaction mechanisms between fluid components and paint polymer structures. Understanding these interactions provides crucial insight into why immediate action becomes so critical when brake fluid contacts vehicle surfaces.
Polyglycol-based DOT 3 and DOT 4 fluid solvent properties
DOT 3 and DOT 4 brake fluids contain polyethylene glycol ethers as their primary base component, typically comprising 60-90% of the fluid volume. These polyglycol compounds possess excellent solvent properties that make them highly effective at dissolving organic materials, including the polymer resins used in automotive paint formulations. The molecular structure of polyethylene glycol creates dipole interactions with paint polymers, gradually breaking down cross-linked structures that provide paint durability and adhesion.
The solvent action begins within seconds of contact, with polyglycol molecules penetrating the paint film through microscopic pores and surface imperfections. Temperature acceleration significantly increases this penetration rate, with heated surfaces showing visible damage in as little as 30 seconds. Laboratory testing demonstrates that DOT 4 fluids, which contain higher concentrations of polyglycol ethers than DOT 3, create more aggressive solvent action and faster paint degradation rates.
Silicone-based DOT 5 fluid impact on automotive clear coat systems
DOT 5 brake fluid utilises silicone-based polymers rather than polyglycol compounds, creating different but equally problematic interactions with automotive paint systems. Silicone fluids demonstrate lower immediate solvent activity compared to polyglycol-based alternatives, but their long-term compatibility issues with clear coat systems can prove more challenging to address. The silicone molecules create a barrier effect on paint surfaces, preventing proper adhesion of subsequent paint layers during repair processes.
Clear coat systems show particular vulnerability to silicone contamination due to surface tension effects that prevent proper wetting and adhesion. Professional paint shops often require complete panel stripping and specialized silicone removal processes when DOT 5 fluid contamination occurs. The molecular weight distribution in silicone brake fluids creates varying penetration depths, with lower molecular weight components penetrating deeper into paint structures while higher molecular weight silicones remain near the surface.
Hygroscopic contamination effects on paint adhesion deterioration
The hygroscopic nature of brake fluids creates additional complications beyond direct chemical solvent action. Brake fluids readily absorb moisture from atmospheric conditions, creating diluted solutions that can penetrate paint films more effectively than pure fluid. Moisture absorption rates increase dramatically in humid conditions, with opened brake fluid containers showing water content increases of 2-3% annually under normal storage conditions.
This absorbed moisture creates hydrolysis reactions within paint polymer structures, particularly affecting urethane and acrylic resin systems commonly used in modern automotive finishes. The combination of chemical solvent action and hydrolytic degradation accelerates paint failure beyond what either mechanism would create independently. Environmental factors such as temperature cycling and UV exposure further amplify these degradation processes, creating progressive damage that extends well beyond the initial contamination area.
<h3
Corrosive additive reactions with metal-based paint pigments
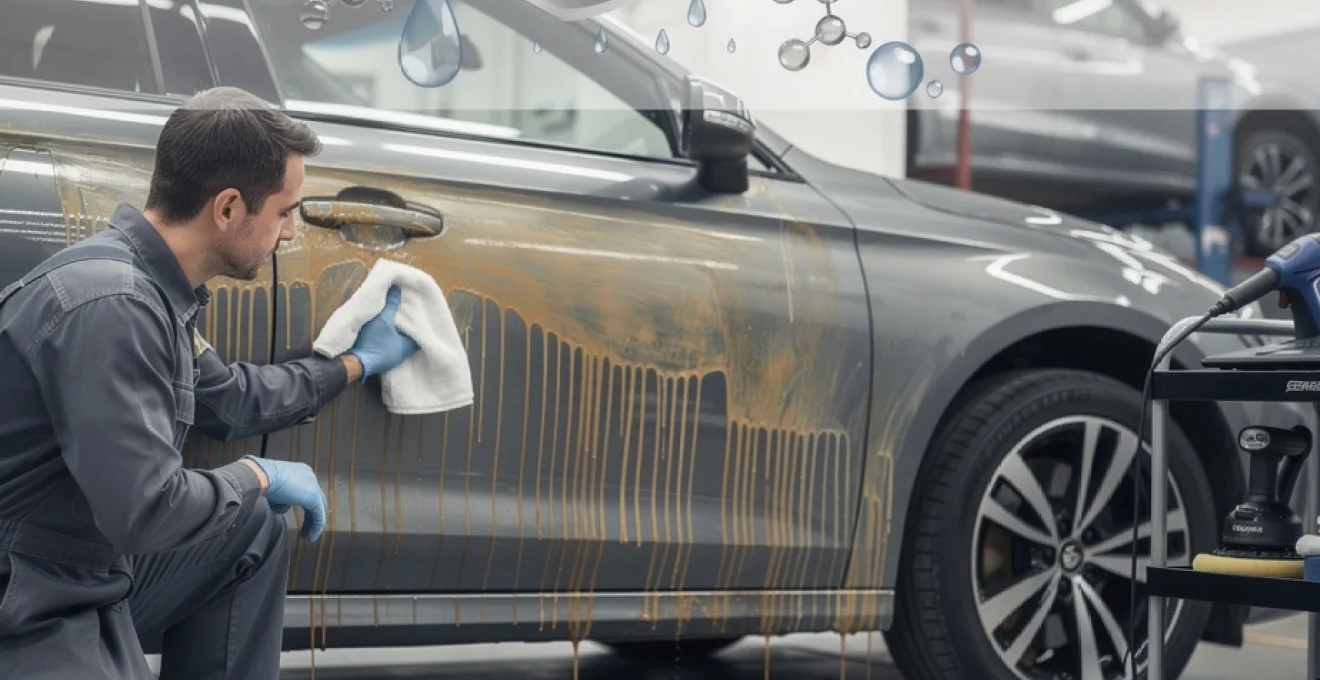
Beyond their base solvents, many brake fluids contain corrosion inhibitors, stabilisers, and anti-oxidant additives designed to protect metal components inside the braking system. When these additives reach the exterior of your car, they can interact aggressively with metal-based pigments and metallic flakes within the paint. The result is a chemical reaction that can cause localised etching, staining, and discolouration that will not wash away with normal car shampoo or gentle cleaning.
Metallic and pearlescent paint finishes are particularly vulnerable because they rely on thin aluminium or mica-based flakes suspended in clear or coloured resin. Brake fluid additives can attack these metallic elements, creating microscopic pits that scatter light differently and produce dull or cloudy patches. In severe cases, the pigment layer can separate from the primer, leading to blistering or peeling that resembles early corrosion even on galvanised body panels.
These reactions are often progressive rather than instant, which means you might not see the full extent of the damage until days or weeks after the initial brake fluid spill. This delayed effect can give a false sense of security if you simply wipe the spill and assume the issue is resolved. Understanding that the chemical interaction continues beneath the surface is why immediate decontamination and careful monitoring are essential whenever brake fluid has touched any painted or metalised area on your vehicle.
Immediate emergency response protocol for brake fluid spills
When brake fluid lands on your car’s paint, the first few minutes matter more than anything else. Your goal is to limit the time the chemical sits on the clear coat and to prevent it from being rubbed deeper into the finish. A structured emergency response protocol helps you stay calm and act efficiently, even if the spill happens while you are in the middle of a repair or stranded at the roadside.
Think of this protocol as a first-aid kit for your paintwork: assess the situation, contain the contamination, gently dilute and neutralise, then protect the area until professional evaluation is possible. By following a consistent step-by-step process, you significantly reduce the risk of permanent etching, hazing, or clear coat failure. Even if some cosmetic damage has already occurred, swift action can limit the repair to light polishing instead of a full panel respray.
Initial contamination assessment using visual inspection techniques
Before you touch anything, take a few seconds to visually assess the brake fluid contamination. Where exactly did the fluid land: on horizontal panels like the bonnet and roof, or on vertical surfaces like doors and wings? Horizontal panels tend to suffer more because the fluid pools and soaks, while vertical panels encourage drips and runs that may spread damage over a larger area.
Look for tell-tale signs such as dull spots, streaks, or areas where the fluid appears to have softened or wrinkled the clear coat. Strong sunlight or a bright LED inspection light can help you see the edges of the affected area more clearly. If possible, photograph the contamination from several angles before you start cleaning; this is not only useful for insurance claims but also for tracking whether the damage worsens over the next few days.
Next, determine the likely exposure time. Did the brake fluid spill just now during a brake bleed, or has it been sitting unnoticed overnight? Fresh spills often appear glossy and wet, while older contamination may look sticky, cloudy, or dust-covered. Remember that even if there is no visible damage yet, the chemical interaction has already started, so you should proceed with emergency cleaning without delay.
Dilution method application with distilled water systems
Once you have assessed the spill, your first active step is to dilute the brake fluid without grinding it into the paint. Distilled water is the safest choice because it contains no minerals or contaminants that could add water spots or react with existing coatings. If distilled water is unavailable in an emergency, clean tap water is still far better than leaving the brake fluid on the surface.
Instead of wiping, gently flood the area with a slow, continuous stream of water, allowing the brake fluid to run off the paint. This is similar to rinsing a chemical burn on skin: the goal is to reduce concentration and contact time rather than scrub the area. Avoid high-pressure jets directly on the contaminated spot, as they can disperse the fluid into adjacent seams, badges, or unprotected areas.
After an initial rinse, you can use a clean, soft microfibre towel soaked in distilled water to lightly blot (not rub) the remaining fluid. Turn the towel frequently so you are always working with a clean side and not re-depositing contaminants. If the spill is large, work from the outside edges toward the centre to minimise spreading the brake fluid to an even wider section of your car’s paintwork.
Neutralisation process using alkaline cleaning solutions
Rinsing alone reduces the concentration of brake fluid on the paint, but it does not fully neutralise the chemical threat. A pH-balanced or slightly alkaline automotive shampoo solution helps break down remaining glycol or silicone residues and lifts them safely away from the clear coat. Avoid harsh household cleaners or degreasers, which may strip waxes and sealants or introduce new chemical conflicts with your vehicle’s paint system.
Prepare a bucket of warm distilled or clean tap water mixed with a high-quality car shampoo according to the manufacturer’s instructions. Using a fresh microfibre wash mitt, gently glide over the affected area with minimal pressure, allowing the detergent to encapsulate and remove the remaining brake fluid. Rinse the mitt frequently to prevent any contaminated shampoo solution from being dragged across unaffected paint.
After thoroughly washing the contaminated region, rinse again with plenty of clean water and then carefully dry the area using a soft, dedicated drying towel. At this stage, you may notice early signs of damage such as hazing, loss of gloss, or slight texture changes. Do not attempt aggressive polishing or household remedies immediately; the paint should first stabilise, and, where possible, you should obtain a professional opinion before further corrective action.
Temperature control considerations during emergency treatment
Temperature has a direct impact on how quickly brake fluid can attack automotive paint, so it should influence how you respond. On a hot day, when the panel temperature can easily exceed 50°C, solvent activity and diffusion through the clear coat accelerate dramatically. In these conditions, you should move the vehicle into shade or a cooler area as soon as possible before you start rinsing.
Conversely, in very cold weather, brake fluid may appear thicker and less active, but the chemical reactions still continue at a slower rate. Cold panels can also make water bead and run unpredictably, potentially spreading diluted brake fluid into panel gaps. Wherever possible, aim to work on surfaces that are cool to the touch but not freezing, which allows cleaning products to perform optimally and reduces the risk of thermal shock to the paint.
If you are working under direct sun and cannot move the car, consider gently cooling the panel with a broad, low-pressure flow of water before performing your main rinse and wash steps. Avoid dramatic temperature swings such as applying ice-cold water to extremely hot paint, as this can stress the clear coat and, in rare cases, cause micro-cracking. Controlled temperature management is a subtle but important part of limiting long-term paint damage from brake fluid exposure.
Documentation requirements for insurance claim processing
If the brake fluid spill is extensive or has affected multiple panels, you may want to involve your insurer, especially when a full repaint or professional brake fluid damage repair is likely. Proper documentation strengthens your case and helps the claims handler understand both the cause and severity of the incident. Start by recording the date, time, and circumstances of the spill, including whether it occurred during a service, accident, or DIY repair.
High-resolution photographs are crucial. Capture close-ups of the affected paintwork, wider shots showing the entire panel, and context images of the overall vehicle. If possible, also photograph the source of the brake fluid leak, such as a damaged brake hose, reservoir, or master cylinder. These images help distinguish between wear-and-tear issues and sudden, accidental damage, which can be treated differently by insurers.
Finally, obtain written estimates from at least one reputable body shop or detailing specialist outlining the recommended repair procedure and associated costs. Include notes on whether panels can be corrected with polishing or require full respraying, as this significantly affects claim value. Keeping all receipts for emergency cleaning products and professional inspections can further support your case and demonstrate that you took reasonable steps to mitigate additional damage immediately after the incident.
Professional paint restoration techniques for brake fluid damage
Once the immediate emergency response is complete and the brake fluid has been safely removed, the focus shifts to restoring your car’s appearance. Depending on how long the brake fluid remained on the paint and the type of fluid involved, the damage may range from slight loss of gloss to severe etching and clear coat failure. This is where professional paint restoration techniques come into play, using specialised tools and products that go far beyond standard hand polishing.
Professional detailers and body shops typically begin with a thorough evaluation of the affected area, often using paint depth gauges, gloss meters, and strong inspection lighting. These diagnostics help determine how much clear coat remains and whether corrective measures like wet sanding and machine polishing are safe. While some minor damage can be addressed at home, advanced restoration methods are best left to trained professionals to avoid accidentally thinning the clear coat to a critical level.
Wet sanding methodology using 2000-grit abrasive systems
Wet sanding is one of the most effective but also most invasive techniques for repairing brake fluid damage on car paint. Using 2000-grit or finer abrasive paper combined with water, technicians level the surface of the clear coat, removing the uppermost layer of damaged material. This process is similar to using ultra-fine sandpaper on a piece of furniture to remove water marks, but executed with far more precision and control.
The technician will typically mask off surrounding trim and edges to avoid accidental damage, then use a sanding block or soft interface pad to maintain uniform pressure. Constant lubrication with clean water is essential to flush away removed clear coat and prevent deep scratches. The aim is to gradually diminish visible etching, orange peel, or surface irregularities caused by the brake fluid, while keeping removal to the minimum necessary.
Because wet sanding physically thins the clear coat, it must be followed by a multi-stage machine polishing process to restore clarity and gloss. This is why it is critical to measure paint thickness before and after sanding, particularly on factory finishes where the original clear coat is usually between 30–50 microns thick. Attempting wet sanding without experience or measurement tools can quickly turn a repairable panel into one that requires complete repainting.
Polishing compound selection for single-stage vs multi-stage finishes
Choosing the right polishing compound after brake fluid damage is not a one-size-fits-all decision. The approach differs significantly between single-stage paint (where colour and gloss are in one layer) and modern multi-stage systems with a separate clear coat. In single-stage finishes, abrasives remove both defects and a small amount of pigment, so the technician must balance defect removal with the risk of uneven colour or thinning.
For multi-stage clear coat systems, most of the work happens in the transparent top layer, allowing slightly more aggressive compounds to be used where sufficient thickness remains. A typical process might start with a medium-cut compound on a foam or microfibre pad to remove sanding marks and etching traces, followed by a finer finishing polish to refine gloss and clarity. In less severe cases of brake fluid exposure, a single finishing polish may be enough to restore the shine.
Why does compound selection matter so much? Using an overly harsh product can introduce holograms, buffer trails, or excessive clear coat removal, while too mild a product may fail to remove the chemical etching at all. Professional detailers often test a small, inconspicuous area first, progressively adjusting pad and compound combinations until they find the least aggressive method that achieves the desired level of correction.
Clear coat repair using airbrush application techniques
In situations where brake fluid has penetrated deeply into the clear coat but not fully compromised the colour layer, targeted clear coat repair can be an efficient solution. Airbrush application techniques allow a skilled technician to resurface only the affected zones rather than repaint an entire panel. This is particularly useful for localised drips or small splash areas that have etched into the clear coat but cover only a limited footprint.
The process begins with careful preparation: the damaged area is cleaned, decontaminated, and lightly sanded to create a suitable bonding surface. After masking surrounding sections, the technician uses an airbrush or mini spray gun to apply thin, controlled layers of automotive clear coat. Each layer is allowed to flash off and partially cure before the next is added, building up sufficient film thickness to match the surrounding factory finish.
Once the new clear coat has cured, the repaired section is wet sanded and machine polished to blend seamlessly with the original paint. When executed correctly, this method can make even close inspection in natural light reveal no apparent transition or edge. However, airbrush clear coat repair requires experience, proper ventilation, and access to compatible materials, which is why it is almost always carried out in a professional body shop or advanced detailing studio.
Colour matching protocols with spectrophotometer analysis
If brake fluid damage has progressed beyond the clear coat and into the colour layer, partial or full panel repainting may be unavoidable. A perfect colour match becomes critical at this stage, especially on modern vehicles where complex metallic and pearlescent finishes are common. Relying on the original paint code alone is rarely sufficient, as ageing, UV exposure, and previous repairs can all shift the actual shade on your specific car.
To achieve an accurate match, many professional paint shops use spectrophotometer analysis. This handheld device scans the paint surface and captures how it reflects light across different wavelengths, creating a digital “fingerprint” of your existing finish. The data is then fed into specialised software that suggests a base formula and fine-tuning adjustments to reproduce the exact colour and effect.
Once the paint is mixed, technicians usually spray test cards and compare them against the vehicle under various lighting conditions—daylight, shade, and artificial light—to confirm the match. Blending techniques are then applied, where the new paint is gradually faded into adjacent panels to make any minute colour differences invisible to the human eye. This meticulous approach is what allows a car with previous brake fluid damage to emerge from the body shop looking as though nothing ever happened.
Long-term paint protection strategies against chemical contamination
After you have dealt with a brake fluid spill once, you are unlikely to forget how vulnerable automotive paint can be. The logical next step is to strengthen your car’s defences against future chemical threats, whether from brake fluid, fuel, bird droppings, or industrial fallout. Long-term paint protection is less about making your car indestructible and more about buying time—time to spot and safely remove contaminants before they can etch or dissolve the clear coat.
Modern protection options range from traditional waxes and synthetic sealants to advanced ceramic and graphene-based coatings. Each forms a sacrificial barrier over the paint, meaning contaminants attack the protective layer first rather than the clear coat itself. While no solution can make brake fluid completely harmless, even a modest layer of protection can slow down penetration and make emergency cleaning more effective.
For many drivers, a layered approach works best. A high-quality ceramic coating provides durable, long-term resistance and easier cleaning, while a wax or sealant topper can be applied periodically to reinforce water behaviour and gloss. Regular washing with a pH-neutral shampoo, prompt removal of any visible spills, and safe drying methods complement these coatings and keep the surface in optimal condition. In essence, you are building a multi-stage defence system where each step reduces risk and extends the life of your paint.
Cost analysis and professional service provider selection criteria
Understanding the potential costs of brake fluid damage repair helps you make informed decisions when an incident occurs. Minor surface hazing that responds to light machine polishing might cost between £80 and £200 at a reputable detailing studio, depending on the size of the affected area. More severe damage requiring wet sanding, multi-stage polishing, and targeted clear coat repair can easily push the bill into the £300–£700 range per panel.
When full repainting is necessary due to deep etching or clear coat failure, body shop costs can vary widely based on paint type, vehicle size, and region. As a general guide, a quality respray of a single panel often starts around £250–£400, with metallic or pearl finishes at the higher end. Complex blends across multiple panels or luxury vehicles with specialised paint systems can exceed £1,000 for a single incident, especially when combined with colour matching and refinishing adjacent sections.
How do you choose the right professional to handle brake fluid damage on car paint? Start by looking for providers who can demonstrate experience specifically with chemical contamination repairs rather than only general polishing. Ask if they use paint depth gauges, spectrophotometers, and documented processes for wet sanding and clear coat repair. Online reviews, before-and-after photo portfolios, and industry accreditations are also strong indicators of competence and attention to detail.
It can be tempting to opt for the cheapest quote, but with paintwork, cutting corners often leads to visible defects, premature failure, or the need to redo the job later. Instead, focus on value: a provider who offers a clear written estimate, explains the steps they will take, and stands behind their work with a guarantee usually represents a safer investment. In the context of preserving your vehicle’s appearance and resale value, paying a little more for a high-quality, long-lasting repair is often the most economical choice in the long run.