Connecting your Vodafone router to an Openreach infrastructure box represents a crucial step in establishing reliable broadband connectivity throughout your home or office. Modern UK telecommunications infrastructure relies heavily on the seamless integration between Openreach’s network equipment and Internet Service Provider (ISP) hardware, with Vodafone being one of the leading providers offering both fibre and traditional broadband services. The process involves understanding the technical specifications of both systems, ensuring proper physical connections, and configuring the appropriate network settings to achieve optimal performance. Whether you’re upgrading from ADSL to fibre or simply replacing existing equipment, the connection procedure requires careful attention to compatibility requirements and proper installation protocols.
Understanding openreach infrastructure and vodafone router compatibility
The Openreach network serves as the backbone for most UK broadband connections, providing the physical infrastructure that enables internet connectivity across the country. This network operates independently from individual ISPs like Vodafone, yet requires seamless integration to deliver services to end users. Understanding this relationship helps clarify why specific connection procedures and compatibility requirements exist between Openreach equipment and Vodafone routers.
Openreach FTTC and FTTP connection types with vodafone equipment
Fibre-to-the-Cabinet (FTTC) connections utilise existing copper telephone lines for the final stretch to your property, while maintaining fibre optic cables to street-level cabinets. This configuration typically supports download speeds up to 80Mbps and upload speeds reaching 20Mbps, depending on your distance from the cabinet. Vodafone routers designed for FTTC connections include built-in DSL modems that communicate directly with the Openreach network through your telephone socket.
Fibre-to-the-Premises (FTTP) installations bring fibre optic cables directly to your property, requiring an Optical Network Terminal (ONT) to convert optical signals into electrical data. These connections can deliver symmetrical speeds exceeding 900Mbps, making them ideal for bandwidth-intensive applications. Vodafone routers connecting to FTTP services require Ethernet connectivity to the ONT rather than direct telephone line connections.
Vodafone router models: THG3000, ultra hub, and power hub specifications
The Vodafone THG3000 serves as the standard router for most residential broadband packages, featuring four Gigabit Ethernet ports, dual-band Wi-Fi capabilities, and integrated telephony functions. This model supports both FTTC and FTTP connections through its DSL and Ethernet WAN ports respectively. The device includes Quality of Service (QoS) management features and supports Wi-Fi 6 technology for enhanced wireless performance.
Vodafone’s Ultra Hub represents their premium router offering, designed for high-performance applications and larger properties. This model incorporates advanced beamforming technology, tri-band Wi-Fi capabilities, and enhanced processor specifications to handle multiple simultaneous connections effectively. The Ultra Hub includes additional security features and supports mesh networking capabilities for extended coverage areas.
BT master socket 5c and NTE5 terminal point requirements
The BT Master Socket 5c represents the current standard for telephone line terminations in UK properties, featuring both RJ11 telephone connections and RJ45 Ethernet ports for modern broadband services. This socket design enables direct connection of FTTC services without requiring additional filters or adaptors. The socket includes a removable lower section that can be disconnected for testing purposes, helping isolate internal wiring issues from external network problems.
Older NTE5 terminal points require additional consideration when connecting modern Vodafone equipment, as these sockets may need upgrading or modification to support current broadband technologies. Proper socket identification becomes crucial for determining appropriate connection methods and potential upgrade requirements. Professional installation may be necessary for properties with outdated terminal equipment to ensure reliable connectivity and compliance with current standards.
Ethernet WAN port configuration on vodafone routers
Vodafone router WAN ports feature auto-negotiation capabilities that detect connection speeds and configure appropriate settings automatically. These ports support Gigabit Ethernet standards and include LED indicators to display connection status and activity levels. The WAN port configuration includes support for
ports on both the THG3000 and Ultra Hub, allowing them to operate purely as Ethernet routers when connected to an Openreach ONT. When using an Openreach fibre connection, the DSL port is not used; instead, you connect the ONT directly to the red-labelled WAN port. In most cases, the Vodafone firmware will automatically detect an active Ethernet WAN signal and default to a DHCP (Dynamic IP) configuration, meaning no manual IP settings are required. However, advanced users can modify WAN profiles in the router’s admin interface to fine‑tune MTU values, DNS servers, and, where supported, PPPoE credentials for specific Openreach-based connections.
Physical connection process between openreach ONT and vodafone router
Identifying openreach huawei EchoLife HG8010H and nokia G-010G-A ONT units
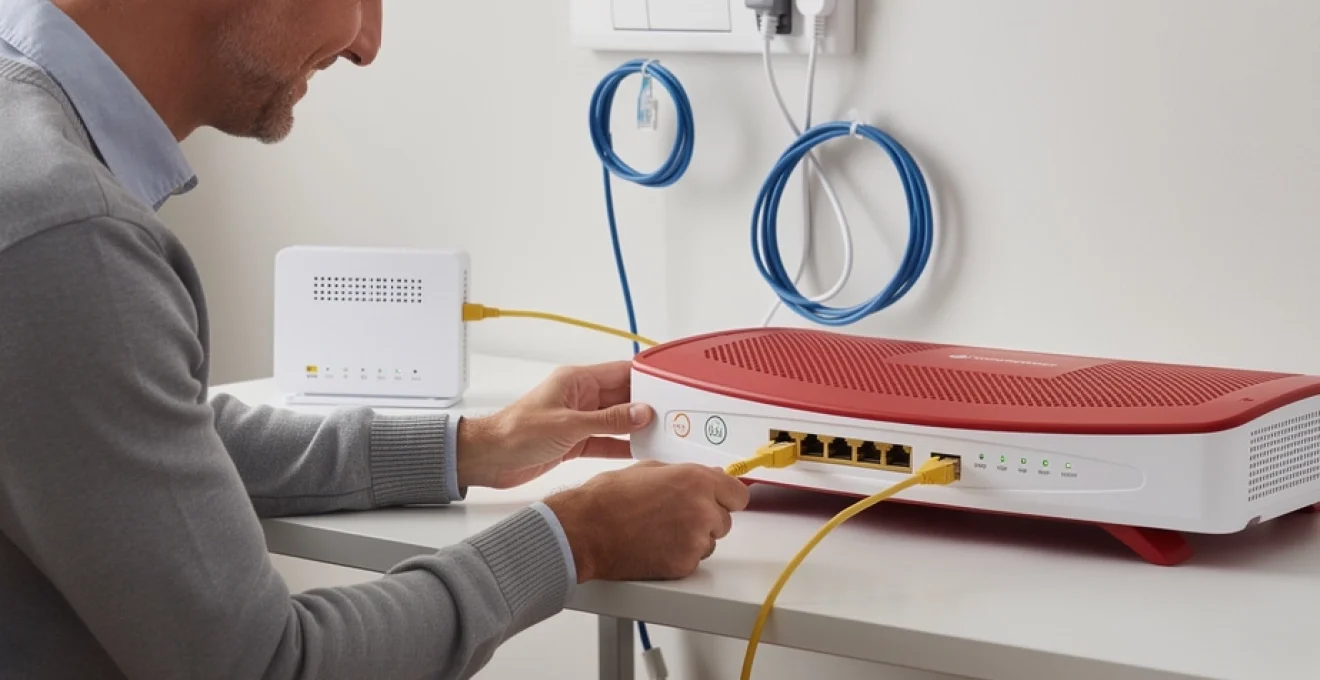
Before you can connect your Vodafone router to an Openreach box, you need to confirm which type of Optical Network Terminal is installed. Two of the most common Openreach ONT units are the Huawei EchoLife HG8010H and the Nokia G‑010G‑A. Both are compact white wall-mounted devices with at least one Ethernet port (typically labelled GE or LAN), an optical fibre input, and a series of LED indicators showing power, optical link status, and LAN activity.
The Huawei EchoLife HG8010H usually features a single Ethernet port on the bottom or side and LEDs labelled PWR, PON, LOS and LAN. The Nokia G‑010G‑A presents a similar layout but may have slightly different iconography, such as a link symbol for the optical connection and a globe or network icon for data activity. In either case, you only ever connect the Ethernet port on the ONT to the WAN port of your Vodafone router; the fibre input is reserved for Openreach engineers and must never be unplugged or tampered with by the end user.
If you are unsure which ONT model you have, check the product label on the underside or side of the unit, where the make, model number, and serial information are printed. Knowing the exact model is particularly helpful when you are following manufacturer-specific LED guidance or when Vodafone support asks you to confirm ONT details during fault diagnostics. Once you have confirmed that the ONT is powered and shows a stable optical connection, you can safely move to the physical cabling step.
Ethernet cable requirements: cat5e vs cat6 for fibre connections
To connect your Vodafone router to the Openreach ONT, you need a suitable Ethernet cable capable of carrying the high speeds that full fibre can deliver. For most residential installations, a Cat5e Ethernet cable is sufficient, as it supports up to 1 Gbps over typical household distances. This level of performance comfortably covers the vast majority of Vodafone FTTP packages, particularly those capped at 100 Mbps, 500 Mbps, or even 900 Mbps downstream.
However, if you are planning to run longer cable routes through walls, under floors, or into structured cabling panels, opting for Cat6 can provide additional headroom and improved noise resistance. Cat6 cables are rated for 10 Gbps up to shorter distances and maintain better performance in electrically noisy environments, such as rooms packed with power adapters, AV equipment, and gaming consoles. Think of Cat5e as a reliable saloon car and Cat6 as a performance estate: both will get you to the speed limit, but the latter handles tougher conditions more gracefully.
When connecting directly between the ONT and Vodafone router, use the shortest practical cable length to reduce the risk of signal degradation and physical damage. Ensure the connectors click firmly into both the ONT Ethernet port and the Vodafone router’s red WAN port. If you experience intermittent connectivity or fluctuating speeds, one of the first troubleshooting steps should be to replace the Ethernet patch cable with a known-good Cat5e or Cat6 lead, as faulty cables are a surprisingly common cause of fibre performance problems.
Power sequence protocol for ONT and router initialisation
The order in which you power your Openreach ONT and Vodafone router can influence how smoothly the two devices negotiate a connection. As a general rule, you should always power on the ONT first and wait for it to establish a stable optical link before turning on the router. This ensures that when the Vodafone router starts its boot sequence and requests an IP address, the upstream fibre connection is already active and ready to respond.
Start by confirming that the ONT power adapter is securely connected to both the wall socket and the device. Switch on the power and wait for the PWR light to go solid green. Over the next 1–3 minutes, the optical link LED (often labelled PON or marked with a network symbol) should transition from blinking to solid, indicating a successful registration on the Openreach network. Only once these LEDs are stable should you connect power to your Vodafone router and press the power button if required.
After turning on the router, allow up to 10 minutes for a full initialisation, firmware checks, and connection negotiation with the Openreach equipment. You may notice several LED sequences as the router cycles through DSL detection (where present), Ethernet WAN detection, and IP provisioning. If you power both devices simultaneously, the router may attempt to obtain an IP address before the ONT has fully synced, leading to temporary “no internet” indications until the next DHCP renewal attempt. Using a deliberate power-on sequence helps you avoid this confusion and makes any subsequent diagnostics more straightforward.
LED status indicators on openreach equipment during connection
Understanding the LED patterns on your Openreach ONT is one of the most practical ways to diagnose broadband issues between the network and your Vodafone router. On Huawei EchoLife HG8010H units, a solid green PWR LED confirms that the device is powered, while a solid or slowly blinking PON LED indicates a healthy optical connection to the exchange. A red or blinking LOS (Loss of Signal) LED signals that the fibre link is down, which typically requires Openreach or Vodafone intervention rather than local cabling checks.
The Ethernet or LAN LED on the ONT is equally important when connecting a Vodafone router. When a cable is plugged in correctly and the router’s WAN port is active, you should see the LAN LED illuminate—usually solid for an idle link and blinking to show data transfer. If the optical link LEDs appear healthy but the LAN LED remains off, the problem may lie with the Ethernet cable, the router’s WAN port configuration, or the router itself. In that situation, swapping cables and rebooting the router are sensible first steps.
Many Vodafone routers also use a central status LED that changes colour based on connection state, offering a quick at-a-glance check from across the room. By comparing the router’s LED colour with the ONT’s indicators, you can quickly determine whether the issue is upstream (fibre line), midstream (ONT-to-router link), or downstream (Wi‑Fi or device configuration). Treat these LEDs as a traffic light system for your network; once you understand what “red”, “amber”, and “green” look like on each component, troubleshooting becomes much more manageable.
Vodafone router configuration for openreach DHCP settings
Once the physical connection between the Openreach ONT and your Vodafone router is in place, the next step is ensuring that the router is correctly configured to obtain an IP address from the network. In most Openreach FTTP deployments used by Vodafone, the connection method for consumer broadband is DHCP over Ethernet rather than PPPoE, meaning your router simply requests an IP address automatically without requiring a username and password. This design keeps configuration straightforward for end users and allows Vodafone to manage IP assignment centrally.
On the THG3000 and Ultra Hub, the default WAN connection profile is pre-set to “Automatic” or “Dynamic IP,” which corresponds directly to DHCP. You can verify this by logging into the router’s web interface (typically via 192.168.1.1 or 192.168.0.1) using the admin credentials printed on the router label. Navigate to the Internet or WAN settings section and confirm that the connection type is set to “Automatic/DHCP” rather than PPPoE or Static IP. If your router was previously used on a different ISP that required manual settings, reverting to DHCP is crucial for a smooth Openreach connection.
After confirming the DHCP configuration, review the WAN status page and look for a valid IPv4 address, default gateway, and DNS servers. If the fields show zeros or remain blank, click the “Renew” or “Connect” button to force the router to request a new lease from Vodafone’s DHCP servers. In some cases—particularly just after activation—it may take several minutes or a reboot for the router to obtain an address, so patience is important. Once a valid IP address and gateway appear, your Vodafone router should provide full internet access to all connected devices via Ethernet and Wi‑Fi.
Troubleshooting common openreach to vodafone router connection issues
Resolving PPPoE authentication failures with vodafone credentials
Although most modern Vodafone FTTP services over Openreach use DHCP, some legacy or business configurations may still rely on PPPoE authentication. In these scenarios, entering the wrong username or password can prevent the router from establishing a session, even when the physical connection and optical signal are perfectly healthy. Symptoms of PPPoE failure often include repetitive connection attempts in the router logs, status messages like “Disconnected – Authentication Failed,” and a lack of public IP address despite an active ONT.
If you suspect your configuration uses PPPoE, log into the router’s admin interface and navigate to the Internet Connection settings. Confirm that the connection type is set to PPPoE and check the username and password fields. These credentials are usually supplied by Vodafone when the service is activated and may follow a specific format (such as user@broadband.vodafone.co.uk). If you have changed your account password recently, you might need to update the PPPoE details accordingly; mismatched credentials can persist for months if left unchecked.
When in doubt, contact Vodafone support and ask them to confirm the correct broadband login credentials and whether your line is configured for DHCP or PPPoE on the Openreach network. Once you have verified the correct settings, enter them carefully—paying attention to case sensitivity—and save the configuration. The router should then attempt to reconnect; if the PPPoE session establishes successfully, you will see an assigned IP address, and the status should change to “Connected.” In the rare case that authentication continues to fail, a factory reset of the router followed by a clean setup can help clear any hidden configuration conflicts.
Addressing VLAN tagging conflicts on fibre connections
Some ISPs operating over Openreach use VLAN tagging to separate different types of traffic, such as internet data and voice services, on the same physical connection. While Vodafone generally pre-configures its own routers to handle any necessary VLAN IDs, problems can arise when you replace the standard hub with third-party equipment or when a firmware update resets your settings. A misconfigured VLAN tag—or the absence of one where required—can prevent the router from obtaining an IP address even though the ONT and physical link appear healthy.
From the end user’s perspective, VLAN tagging is a bit like sorting letters into colour-coded envelopes before they are sent; if you use the wrong colour, the sorting office has no idea where to deliver them. In networking terms, if your router tags traffic with the wrong VLAN ID, the upstream equipment may silently drop all packets, leading to a frustrating “connected but no internet” experience. This issue often surfaces when people follow generic fibre setup guides that don’t account for Vodafone’s specific network configuration.
To address potential VLAN conflicts, check your router’s WAN settings for any VLAN or “802.1Q” options. On Vodafone-supplied hubs, these are typically hidden from the main interface and controlled automatically, which is why plug-and-play tends to work out of the box. If you are using a third-party router, consult Vodafone’s technical documentation or support channels to confirm the correct VLAN ID for your area and service type before making changes. Once you apply the appropriate VLAN configuration—or disable VLAN tagging if Vodafone confirms it is not required—reboot the router and ONT to initiate a fresh DHCP or PPPoE negotiation.
ONT reset procedures using recessed reset button
When persistent connection issues arise that cannot be explained by router misconfiguration or faulty cabling, performing a controlled reset of the Openreach ONT can help restore service. Most Huawei and Nokia ONTs installed by Openreach include a small recessed reset button, accessible with a paperclip or SIM eject tool. This button is typically located near the power input or Ethernet port and may be labelled “RESET” or represented by a circular arrow icon.
To reset the ONT safely, first ensure that you are not pressing the reset button unnecessarily; frequent resets can complicate fault tracking by your ISP. If Vodafone support recommends an ONT reset, gently insert your tool into the recess and press the button for around 5–10 seconds until the LEDs blink or the power light cycles off and back on. Release the button and allow the ONT several minutes to re-establish its optical link with the Openreach network. During this time, the PON and LOS indicators may flash as the device re-registers with upstream equipment.
Once the ONT has completed its reboot and the LEDs return to their normal, stable pattern, you can reboot your Vodafone router to ensure it starts a fresh negotiation for IP addressing. If the ONT fails to show a solid link light after a reset, this may indicate a deeper fibre problem, such as line damage or an exchange-side fault, which only Openreach can rectify. In those cases, document the LED behaviour and time of the reset so you can provide accurate information to Vodafone’s technical team, helping them escalate the fault more efficiently.
Router factory reset via WPS button method
Sometimes, the quickest way to resolve strange or intermittent connectivity issues is to return your Vodafone router to its factory defaults. Over time, manual tweaks to settings, firmware updates, and outdated Wi‑Fi configurations can all contribute to instability. The THG3000 and related models often allow a hardware reset using the WPS button, either alone or in combination with the recessed reset button, depending on firmware version. Always consult your specific router’s quick start guide before proceeding, as reset methods can vary slightly.
A typical factory reset procedure involves holding down the WPS button for around 10–15 seconds while the router is powered on, until the status LED begins to flash in a distinct pattern. Alternatively, you may need to use the dedicated reset pinhole on the rear of the device, again holding it for several seconds until the router restarts. After releasing the button, wait patiently as the router reboots, which can take up to 5 minutes. During this time, the device will clear custom settings, including Wi‑Fi names, passwords, and advanced WAN configurations.
Once the factory reset is complete, you can reconnect your Ethernet cable from the Openreach ONT to the WAN port and follow Vodafone’s default setup process, either via the web interface or mobile app. While it may feel drastic, a full reset gives you a clean slate and eliminates the risk that a forgotten custom setting is silently blocking your fibre connection. Just remember to reconfigure any port forwarding, parental controls, or custom DNS settings you previously relied on, as these will not be preserved.
Advanced configuration: port forwarding and network security setup
With the basic connection between your Vodafone router and Openreach box stable, you may want to tailor more advanced features such as port forwarding and security. Port forwarding is essential if you run services at home that need to be accessible from the internet, such as game servers, remote desktop systems, or home automation platforms. In simple terms, it acts like a receptionist that knows exactly which internal device should receive particular types of incoming traffic, rather than leaving everything at the front desk.
To set up port forwarding on a THG3000 or Ultra Hub, log into the router’s web interface and locate the “NAT,” “Port Forwarding,” or “Applications” section. Here, you can define rules mapping external ports (for example, TCP 3389 for Remote Desktop) to the internal IP address of the relevant device. It is important to assign that device a reserved DHCP address or static IP so the rule does not break if the address changes. Once configured, test the open ports using an external connection or an online port checker to confirm that the traffic is reaching the correct device via your Openreach fibre connection.
Security should evolve alongside these advanced capabilities. Enabling strong WPA2‑PSK or WPA3 encryption on your Wi‑Fi, using unique and complex passwords, and disabling unused services on the router all help reduce the attack surface. You can think of this as fitting deadbolts and an alarm system after installing a new front door; the fibre connection provides speed, but it is robust security settings that keep unwanted guests out. In addition, enabling the router’s built-in firewall and intrusion detection features, where available, adds another defensive layer.
For users needing extra separation—for example, those who host public-facing servers or allow guests frequent access—consider configuring a guest Wi‑Fi network or, on more advanced setups, separate VLANs. A guest network keeps visitors away from your main LAN, ensuring that even if a device is compromised, your core systems remain protected. When combined with a properly configured Openreach–Vodafone connection, these measures help you enjoy the benefits of high-speed fibre broadband without compromising on security or stability.
Performance optimisation for vodafone router and openreach integration
Even after your Vodafone router is successfully connected to the Openreach box, there is often room to optimise performance and get the most from your fibre line. Start by verifying your actual speeds using a wired device connected directly to the router via Ethernet, as Wi‑Fi alone can mask the true capability of your connection. Compare your results with the speeds promised in your Vodafone contract; remember that UK regulations focus on “minimum guaranteed” rather than headline speeds, so mild variation is normal, but major discrepancies warrant further investigation.
Wi‑Fi optimisation is the next step, as many performance complaints stem from wireless interference rather than issues with the Openreach infrastructure. Place the router in a central, elevated position away from thick walls, metal objects, and other electronics that can cause signal reflection or noise. On dual-band or tri-band Vodafone routers, use the 5 GHz or 6 GHz bands for high-speed devices where range permits, reserving 2.4 GHz for IoT gadgets and longer-distance coverage. Changing the Wi‑Fi channel to avoid congested frequencies—particularly in dense urban environments—can also yield noticeable improvements.
Internally, enabling Quality of Service (QoS) or traffic prioritisation can help ensure smooth performance when multiple devices compete for bandwidth. For example, you might prioritise video conferencing and online gaming over large file downloads, preventing a single user from saturating the line and degrading everyone else’s experience. Think of QoS as a traffic management system on a motorway: it does not increase the number of lanes, but it does ensure that emergency vehicles and priority users are not stuck behind slow-moving lorries.
Lastly, keep both your Vodafone router and any connected mesh or access point systems up to date with the latest firmware. Manufacturers frequently release performance enhancements, security patches, and compatibility improvements tuned for Openreach-based networks. Periodically rebooting the router and ONT—perhaps once every month or two—can also clear transient errors and refresh DHCP leases. By combining good physical placement, thoughtful configuration, and regular maintenance, you ensure that your Vodafone router and Openreach box work together to deliver the fast, stable broadband connection your household or office depends on.