Installing a recessed gas meter box represents a significant upgrade to both the functionality and aesthetic appeal of any property. Unlike surface-mounted alternatives that protrude noticeably from exterior walls, recessed installations sit flush within the masonry, creating a streamlined appearance whilst maximising usable space in walkways and narrow passages. This approach has become increasingly popular among homeowners seeking to modernise their gas infrastructure whilst maintaining architectural integrity. The process involves careful planning, precise execution, and strict adherence to safety regulations that govern gas installations throughout the United Kingdom. Whether you’re relocating an existing meter or installing gas services for the first time, understanding the technical requirements and procedural standards will ensure a compliant, safe, and professionally finished installation.
Understanding building regulations and gas safety requirements for recessed meter box installation
Before attempting any work involving gas infrastructure, you must understand the comprehensive regulatory framework that governs such installations. The legal landscape surrounding gas work in the UK is deliberately stringent, designed to protect both installers and occupants from the potentially catastrophic consequences of improper installation. Gas-related incidents, though relatively rare, can result in explosions, carbon monoxide poisoning, and fire damage, making regulatory compliance absolutely non-negotiable.
Gas safe register compliance and legal obligations under GSIUR 1998
The Gas Safety (Installation and Use) Regulations 1998 establish the fundamental legal framework for all gas work in Great Britain. These regulations stipulate that only Gas Safe registered engineers may work on gas fittings, pipework, and appliances. This legal requirement exists to ensure that anyone working with gas infrastructure possesses the necessary competence, training, and insurance coverage. Whilst you can prepare the wall cavity and install the physical meter box housing yourself, any connection to gas pipework must be completed by a Gas Safe registered professional. Attempting to connect gas supplies without proper registration constitutes a criminal offence punishable by fines up to £20,000 and potential imprisonment. The Gas Safe Register maintains a publicly searchable database where you can verify an engineer’s credentials before permitting them to work on your property.
Building control notification requirements and approved document J standards
Beyond gas-specific regulations, structural alterations to external walls typically require notification to your local authority’s Building Control department. When creating a recess in a load-bearing wall, you’re fundamentally altering the structural composition of your building. Approved Document J of the Building Regulations specifically addresses combustion appliances and fuel storage systems, providing technical guidance on ventilation, positioning, and structural considerations. Most local authorities will require notification before work commences, particularly if you’re installing lintels or making openings exceeding certain dimensions. The notification process typically involves submitting detailed plans showing the proposed opening dimensions, lintel specifications, and meter box positioning. Building Control officers may conduct site inspections at various stages to ensure compliance with structural standards.
Minimum ventilation clearances and BS 6400 specifications
British Standard 6400 establishes specific requirements for meter box installations, including critical ventilation parameters. Gas meter boxes must incorporate adequate ventilation to prevent gas accumulation in the event of a leak. The standard specifies minimum ventilation areas relative to box volume, typically requiring ventilation slots totalling at least 5% of the enclosure’s floor area. Additionally, meter boxes must maintain minimum clearances from potential ignition sources: typically 150mm from electrical equipment, 300mm from windows or doors, and 600mm from ground level to prevent flooding damage. These clearances ensure that any escaped gas can safely disperse rather than accumulating to dangerous concentrations. The positioning of your recessed box must satisfy these clearance requirements whilst also providing convenient access for meter readers and emergency services.
Local distribution network operator (DNO) approval process
Your regional gas Distribution Network Operator—whether National Grid, Cadent, SGN, Northern Gas Networks, or Wales & West Utilities—must approve meter relocations and new installations. This approval process ensures that proposed installations meet network standards and can be safely connected to the gas supply infrastructure. Contact your DNO early in the planning process, as they’ll provide specific requirements regarding box positioning, pipe routing, and installation standards. Many DNOs will install surface-mounted meter boxes as part of their service but decline to install recessed boxes, instead permitting customers to install the housing
yourself in advance, on the condition that a Gas Safe engineer ultimately connects and commissions the meter. In practical terms, this often means you are responsible for creating the recess, securely fixing the recessed meter box, and ensuring the opening complies with BS 6400 and the DNO’s siting rules, before their technician arrives on site.
Selecting the correct recessed gas meter box type and positioning
Once you are clear about the regulatory framework, the next step is choosing the right type of recessed gas meter box and the most suitable location on your property. The choice between surface-mounted, semi-concealed, and fully recessed boxes will affect not only the appearance of your external wall, but also access for meter readers, potential future maintenance, and how much structural work is required. A carefully chosen position can reduce installation complexity, minimise disturbance to internal finishes, and help maintain good thermal performance of the building fabric.
Surface-mounted versus semi-concealed box configurations
Homeowners often ask whether a fully recessed meter box is always the best choice, especially when a surface-mounted unit is quicker and cheaper to install. Surface-mounted gas meter boxes fix onto the face of the wall and typically require only a small penetration for the gas pipe, so they are ideal where you want to avoid cutting a large opening into the masonry. However, they do project around 200–230mm from the wall, which can be intrusive in narrow side passages or front elevations where space and aesthetics matter. By contrast, semi-concealed and fully recessed gas meter boxes sit largely within the wall cavity, usually protruding no more than 60–80mm, which makes them far less obtrusive and easier to live with in tight walkways.
A semi-concealed configuration is often used at low level or in garden areas where the top lid of the box is visible but the main body is buried or recessed. Fully recessed gas meter boxes, such as the standard UK MK2 recessed type, are purpose-designed to fit typical 100–150mm cavity walls and are a common specification for new-build housing. When deciding between these options, you should weigh up the additional work of cutting out brickwork against the long-term benefit of a flush, protected installation. If you already have a narrow 1–1.5m alleyway, opting for a recessed box can make daily movement far more comfortable, even though the initial masonry work is more demanding.
Material options: GRP, stainless steel, and powder-coated mild steel enclosures
Most domestic recessed gas meter boxes in the UK are manufactured from glass reinforced plastic (GRP), sometimes referred to as fibreglass. GRP boxes are lightweight, corrosion-resistant, and inherently non-conductive, which is advantageous around metallic gas pipework and damp external environments. They also meet fire-retardant standards such as BS 476 Part 7 Class 2 and are fully compatible with BS 8499, which covers meter box design and performance. For most residential settings, a standard white GRP recessed meter box is perfectly adequate and offers the best balance of cost, durability, and ease of installation.
In harsher environments or where vandal resistance is a concern, stainless steel or powder-coated mild steel gas meter enclosures may be specified instead. These metal boxes offer higher impact resistance and can be colour-matched to façades, but they are heavier to handle and usually more expensive. Steel enclosures must be properly earthed if required by the design and should incorporate rust-resistant fixings to prevent staining of brickwork over time. For coastal locations with high salt exposure, marine-grade stainless steel or high-quality powder coatings with a long warranty are worth considering, as they significantly extend the life expectancy of the meter housing compared to cheaper painted alternatives.
Standard dimensions for U6 and U16 meter housings
Recessed gas meter boxes are designed around the physical size of the gas meters they are intended to house. In domestic and small commercial properties, the most common meter sizes are U6 (equivalent to G4), typically used for standard homes, and U16, used where higher gas loads are expected, such as larger properties with multiple boilers. A standard domestic recessed meter box suitable for a U6/G4 meter will usually have external dimensions around 595mm high by 410mm wide by 210mm deep, with a recommended wall cut-out of roughly 535mm by 365mm by 150mm. Always check the manufacturer’s technical datasheet to confirm the exact recess size required for your chosen model.
U16 meter boxes are noticeably larger and may require bespoke or commercial-grade housings with increased internal volume and enhanced ventilation slots. Fitting a box that is too small can restrict clearances around the meter and regulator assembly, making it harder for engineers to work safely inside the cabinet. When in doubt, consult your Gas Safe engineer or DNO to confirm what meter size your anticipated demand requires, and select a recessed box explicitly rated for that meter category. Overspecifying the box slightly can provide more working room and flexibility if your gas demand increases in future, for example if you add an extra boiler or high-output gas appliance.
Wall cavity depth assessment and structural load considerations
Before you commit to cutting into any external wall, you must verify that the wall construction and cavity depth are compatible with the chosen recessed gas meter box. Most standard recessed boxes are designed for modern 100mm cavity walls with a 102.5mm outer leaf of brick and a 100mm inner leaf of block or brick. Older properties, particularly those built around 1900, might feature thicker solid walls or non-standard cavity widths, which can complicate installation. If the cavity is significantly shallower than the box depth, the back of the cabinet could foul internal finishes or compromise internal insulation, so careful measurement is essential.
Structural load is another key consideration, because removing brickwork to create a recess alters the way loads are transferred through the wall. As a rule of thumb, if the opening is confined to the outer leaf and is smaller than the width of a standard door, a properly installed concrete or steel lintel will usually maintain adequate support. However, the presence of nearby openings—such as windows and doors—can change the load paths dramatically. When there is any doubt about how the brickwork above will behave once bricks are removed, you should seek advice from a structural engineer or Building Control officer. Remember that the cost of professional advice is negligible compared to rectifying a compromised structural wall later.
Preparing the wall cavity and creating the recess opening
With the meter box selected and its position agreed with your DNO and Gas Safe engineer, you can move on to the physical preparation of the wall. This stage is where most DIY installers feel apprehensive, because it involves cutting into the external fabric of the building. Done methodically, however, the process is straightforward and controlled, rather than destructive. The aim is to create a clean, accurately sized opening with well-supported brickwork above and an undamaged internal leaf, ready to receive the recessed meter cabinet.
Locating existing gas supply pipework using CAT and genny detection tools
Before you lift a grinder or drill, you must ensure that there are no hidden services—gas, water, electricity, or telecoms—where you intend to cut. Striking a buried gas pipe or mains cable is not only dangerous; it can also be extremely expensive to repair and may involve statutory investigations. Professional installers use cable avoidance tools (CAT) and signal generators (Genny units) to scan the wall and surrounding ground for live services. While these tools are more commonly associated with underground service detection, they are equally useful when planning how to route a new gas supply into a recessed box location.
If you do not have access to CAT and Genny equipment, your Gas Safe engineer or groundwork contractor may be able to survey the area for you before you start cutting. In addition, cross-check any available as-built drawings, meter positions, and visible pipework routes to infer likely service paths. Take particular care near existing gas meters, boiler flues, and incoming electrical supplies, as routes often converge in these zones. Mark any known or suspected service lines clearly on the wall with chalk or pencil, and maintain generous clearances when cutting the recess. It is better to move the meter box position slightly than to risk contacting concealed services embedded in the brickwork.
Masonry cutting techniques with angle grinders and SDS drills
Once you are confident the area is clear of services, you can accurately mark out the recess opening on the external brickwork. Use the manufacturer’s template where provided, or measure the required cut-out dimensions and add a small tolerance—typically 5–10mm around the perimeter—to allow for adjustment and mortar bedding. A 9-inch (230mm) angle grinder fitted with a diamond masonry blade is usually sufficient to cut through the outer brick leaf from the outside. Because the blade will not always reach the full depth of the brick, you will need to complete the cut from the other side or use a combination of drilled holes and a bolster chisel to break out the remaining material.
To maintain straight edges, first score shallow guide cuts along the marked lines before deepening the cuts in multiple passes. This reduces the chance of the grinder jumping or wandering and helps keep dust down. An SDS-plus or SDS-max drill can then be used to create a line of perforations around the perimeter, allowing bricks to be gently knocked out using a lump hammer and bolster. Approach this like sculpting rather than demolition—removing small sections at a time to avoid cracking bricks beyond the opening. If you are working on a cavity wall, be careful not to inadvertently damage the inner leaf or cavities when the final bricks give way. You want a neat tunnel through the outer leaf only, with the inner wall left mostly intact except for the planned pipe penetration point.
Installing concrete lintels for structural integrity in brick and block walls
Where the recess extends beneath more than a couple of brick courses, you will usually need to install a lintel to bridge the opening and support the load above. For standard domestic recessed gas meter boxes, a small pre-stressed concrete lintel is typically adequate, provided it has sufficient bearing (often 150mm minimum) on each side of the opening. The lintel is normally installed above the top of the cut-out, with bricks removed to create a slot into which the lintel can be bedded on strong mortar. This ensures that the brickwork above is effectively carried across the recess, preventing sagging or cracking over time.
During lintel installation, temporary support may be necessary using strongboys or acrow props if you are removing a substantial number of bricks or working close to other openings. It is essential to follow the manufacturer’s span tables and any structural calculations provided by your engineer or Building Control. Once the lintel is in place and the mortar has cured, you can safely remove any temporary props and continue trimming the opening beneath to its final size. Think of the lintel as a bridge carrying the masonry “traffic” above your new meter box; underspecifying it can lead to long-term cracking and water ingress around the recess.
DPC installation and weatherproofing membrane application
Creating a recess in the outer leaf inevitably alters the original damp-proofing arrangement, so you must reinstate a damp proof course (DPC) and weatherproof the cavity to prevent moisture tracking into the building. Most recessed meter box kits are designed so that the flange of the box overlaps the external brickwork and helps deflect rainwater. However, best practice is to install a flexible DPC or cavity tray above and around the recess, lapping it into the existing DPC where possible. This ensures that any water penetrating the outer skin is directed back outwards rather than bridging across to the inner leaf.
A self-adhesive flashing tape or pre-formed cavity tray can be fixed above the lintel, with the edges dressed into the brick joints and sealed. On the sides and base of the opening, you may also apply a breathable but waterproof membrane to the exposed surfaces of the cavity and outer bricks. Just as a window opening relies on sill trays and DPCs to keep water at bay, a recessed gas meter box must be detailed so that wind-driven rain cannot migrate behind the box and into the property. Paying attention to these hidden membranes will significantly reduce the risk of damp patches or efflorescence appearing around the meter location later on.
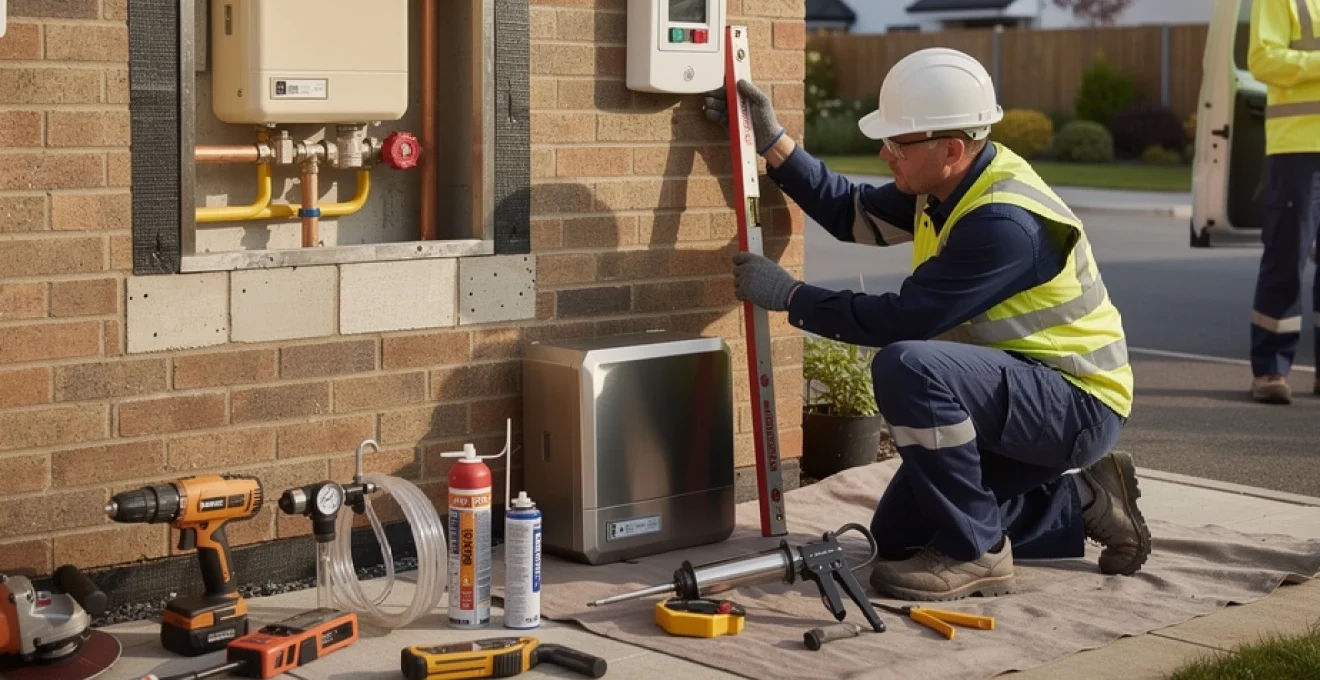
Installing the meter box housing and securing the assembly
With the structural opening prepared, lintel installed, and damp-proofing measures in place, you can move on to fitting the recessed meter box itself. This stage focuses on accurately positioning the housing, anchoring it securely to the masonry, and ensuring it sits plumb and level with the surrounding brickwork. The goal is to create a rigid, durable frame that will support the weight of the meter, withstand everyday knocks, and remain weather-tight over the life of the installation.
Frame fixing methods using mechanical anchors and chemical resin systems
Recessed meter boxes are typically secured to the surrounding masonry through pre-formed fixing points in the side or rear of the housing. Some modern GRP boxes, however, are designed to be held solely by the surrounding mortar and should not be drilled, as extra fixings can void manufacturer approvals and cause DNOs to refuse meter installation. Always follow the specific fixing guidance included with your meter box, and check with your DNO or Gas Safe engineer if you are unsure. Where mechanical fixings are permitted, through-screws with nylon or stainless-steel wall plugs are a common choice for brick and block substrates.
In older or degraded masonry, or where you are close to the edge of bricks, chemical resin anchors can offer superior pull-out strength and reduce the risk of cracking. These systems use a two-part resin injected into a pre-drilled hole, into which a threaded stud or screw is then inserted. Once cured, the resin effectively glues the fixing into the substrate, creating a very secure attachment. Whether you choose mechanical or resin fixings, aim for a minimum of four secure anchor points, and avoid overtightening screws, which can distort the GRP frame. You are looking for firm contact without stressing the box shell itself.
Spirit level alignment and vertical plumb accuracy standards
It may sound obvious, but taking the time to plumb and level the recessed meter box is crucial for a professional finish. A twisted or sloping box will be very noticeable against the brick coursing, and misalignment can cause operational issues with the door, lock, and hinges over time. Use a quality spirit level on both the top and sides of the housing, checking that the front face is flush with or slightly proud of the external brickwork. Small plastic packers or mortar shims can be inserted behind the flange to correct minor inconsistencies in the wall.
As you tighten fixings or bed the box in mortar, re-check the level frequently, because it is easy for the box to shift slightly as pressure is applied. Aim for a tolerance of no more than a couple of millimetres deviation from plumb across the full height of the box. Think of this stage as you would fitting a door frame or window; investing a few extra minutes to achieve perfect alignment will pay back every time the meter door is opened and closed. An accurately aligned box will also help your DNO technician when fitting the regulator and pipework, as clearances and access points will be exactly where the design intends.
Sealing gaps with low-modulus silicone and expanding foam
Once the box is fixed in its final position, you need to seal any gaps between the housing and the surrounding masonry to prevent water ingress, draughts, and heat loss. A low-modulus, neutral-cure silicone sealant is typically recommended for sealing the external perimeter because it adheres well to both GRP and brick, and remains flexible over time. Apply a continuous bead around the visible edges of the flange, tooling it neatly with a profiling tool or gloved finger to achieve a smooth finish that sheds water away from the joint. Internally, if there is a void around the sides or back of the box within the cavity, a careful application of low-expansion PU foam can help to close the gaps.
When using expanding foam, take care not to overfill the cavity, as excessive pressure can distort the box or bow adjacent brickwork. Once the foam has cured, any excess can be trimmed back and, if necessary, covered with a thin parge coat of mortar or fire-resistant sealant, depending on the specification. Sealing these voids not only improves weather protection but also reduces the risk of cold bridging around the recess, which could otherwise lead to condensation internally. By treating the box perimeter like you would a window frame—with robust, flexible sealing and good attention to detail—you help ensure the recessed gas meter box remains dry, stable, and efficient in the long term.
Connecting the gas supply pipework to the recessed installation
With the physical housing installed and sealed, the focus shifts to the gas pipework connection. At this point, your role as a homeowner or general builder should largely be complete, with a qualified Gas Safe engineer taking over any work involving gas pipes and fittings. This division of responsibilities is not just best practice; it is a legal requirement under GSIUR 1998. Nonetheless, understanding the sequence of operations will help you coordinate trades, plan wall penetrations correctly, and ensure the final connection is both safe and future-proof.
Extending 28mm copper or PE pipe through the cavity wall
Most modern gas supplies to external meter positions use polyethylene (PE) pipe underground, transitioning to copper or steel pipework within the meter box and inside the property. The DNO or utility contractor will typically run the PE service pipe up into the bottom of the recessed box through a pre-formed entry point, terminating it with a steel or brass outlet and emergency control valve. From there, your Gas Safe engineer will extend copper pipe—often 22mm or 28mm in diameter, depending on appliance demand—through the wall into the building. The exact pipe size is calculated based on pipe run length and expected gas load, using pressure drop formulae outlined in BS 6400.
Penetrations through the inner leaf and cavity must be planned and drilled carefully to maintain both structural integrity and weather resistance. A core drill or appropriately sized masonry bit is used to create a smooth, slightly oversized hole for the pipe, allowing the engineer to insert a suitable sleeve. The pipe then passes through this sleeve rather than bearing directly on the masonry, preventing abrasion and accommodating minor movement. Any remaining gaps around the sleeve are sealed with non-hardening mastic or fire-rated sealant as required, ensuring that the cavity remains protected from air leakage, moisture ingress, and potential gas migration in the unlikely event of a leak within the meter box.
Installing isolation valves and emergency control valve positioning
The emergency control valve (ECV) is the main shut-off point for the gas supply and must be easily accessible within the recessed meter box. DNO technicians typically install the ECV on the outlet of the service pipe as part of their scope of work, ensuring it complies with visibility and operability requirements. Your Gas Safe engineer will then connect the internal installation pipework downstream of this valve, often incorporating additional isolation valves for specific branches or appliances. Strategically locating these valves makes future maintenance simpler and allows sections of the system to be isolated without cutting gas to the entire property.
The valve handle should be clearly visible when you open the meter box door, with enough clearance to operate it quickly in an emergency. Labels or tags indicating the open and closed positions are usually provided and should not be removed. If the recessed box is positioned in a tight alleyway or near obstructions, make sure there is still sufficient room to stand and safely operate the ECV without climbing or stretching. Think of the ECV as your “main switch” for gas—if a smell of gas is detected, you or the emergency services must be able to access and operate it within seconds.
Pressure testing procedures using manometers and let-by testing
After the pipework is connected, your Gas Safe engineer will perform a series of tests to verify that the system is gas-tight and safe to commission. This usually starts with a let-by test, where the engineer confirms that the ECV itself is sealing correctly when in the closed position. A small U-tube or digital manometer is connected to the test point, and the valve is observed for any pressure rise over a defined time interval. If the valve passes the let-by test, the engineer proceeds to a tightness test on the entire installation pipework upstream of the meter, following procedures laid down in national standards.
During these tests, the system is pressurised—typically to around 20–21 mbar for low-pressure natural gas installations—and the pressure is monitored for any drop that would indicate a leak. Ambient temperature, pipe volume, and test duration are all taken into account when interpreting the results. You may see your engineer isolating appliances, capping off unused branches, or checking joints with leak detection fluid as part of their diagnostic process. This meticulous testing is your assurance that the recessed gas meter installation, from the service pipe entry through to the internal distribution pipes, is free from leaks and ready for safe operation.
Final commissioning and post-installation documentation
The final phase of installing a recessed gas meter box is commissioning and documentation. This is where all the previous work—structural, mechanical, and gas-related—is verified, recorded, and formally signed off. Proper documentation is not just a bureaucratic formality; it provides an auditable trail showing that the installation complies with relevant regulations and standards. This paperwork may be required when selling the property, renewing insurance, or responding to any future queries from Building Control or your gas supplier.
Tightness testing protocol to 21 mbar working pressure
As part of final commissioning, your Gas Safe engineer will carry out a formal tightness test at the system’s normal operating pressure, which for most domestic natural gas installations is 21 mbar. This test confirms that, with all appliances connected and isolation valves open, the complete installation is leak-free under typical working conditions. The procedure follows BS 6400 and IGEM/UP/1B guidelines, with defined stabilisation and test periods depending on the total volume of pipework. Any observed pressure drop must fall within strict tolerances; otherwise, the engineer will systematically investigate and rectify leaks before retesting.
In addition to pressure measurements, the engineer will often perform functional checks on each connected appliance, ensuring that burners light correctly, flame pictures are stable, and flue systems are operating safely. They may also verify that the meter index is turning as expected under load and that no abnormal noises or vibrations occur within the recessed box. Once all tests are satisfactorily completed, the installation can be deemed safe to use, and the engineer will restore normal gas supply, leaving the emergency control valve in the open position unless instructed otherwise.
Completing CP1 notification forms for transco or cadent gas networks
For many new connections, meter relocations, or significant alterations to the gas supply, formal notification to the relevant gas network operator is required. Historically, CP1 forms were used to notify Transco of new gas installations; today, equivalent documentation is submitted to regional operators such as Cadent, SGN, Northern Gas Networks, or Wales & West Utilities. Your Gas Safe engineer or the DNO’s technician will usually handle this process, supplying details of the new meter location, pipework layout, and commissioning results. The network operator uses this information to update their records and confirm that the new recessed meter position is connected correctly to the distribution main.
From your perspective as the property owner, it is important to ensure that you receive copies or references of any notifications submitted on your behalf. These documents can be invaluable if you later query supply issues, request an upgrade in capacity, or need evidence that the recessed meter box installation followed recognised procedures. While you are unlikely to fill in a CP1 or its modern equivalent yourself, understanding that this documentation exists—and asking for confirmation that it has been lodged—helps close the loop between physical works on-site and the administrative systems that support the gas network.
Issuing gas safety certificates and building control sign-off
Once the installation has passed all safety checks, your Gas Safe engineer will issue the appropriate certification. For domestic properties, this is often a Gas Safety Record or commissioning certificate noting key details such as appliance types, meter location, test results, and any safety advice. If the recessed meter box installation formed part of a wider refurbishment or structural alteration, Building Control may also require evidence of compliance, including lintel specifications, DPC detailing, and confirmation that the opening meets Approved Document J requirements. A Building Control officer may conduct a final inspection before issuing a completion certificate.
Retain all certificates, drawings, and product literature for your records, ideally in a single folder or digital archive tagged to the property. In the event of future works—such as upgrading a boiler, altering internal pipe routes, or changing the meter—these documents will help engineers understand how the recessed gas meter box was originally installed. More importantly, they provide reassurance that the installation was completed to a professional standard and in full compliance with UK gas safety and building regulations. With the box properly recessed, structurally supported, and fully certified, you can enjoy a safer, smarter, and more discreet gas supply arrangement for many years to come.