The Tesla Model Y has revolutionised the electric SUV market with its impressive range, cutting-edge technology, and sleek design. However, for adventurous owners who require additional cargo capacity for outdoor equipment, sporting gear, or holiday luggage, the standard boot space may prove insufficient. Installing roof bars transforms your Model Y into a versatile adventure vehicle whilst maintaining its sophisticated aesthetic appeal.
Understanding the intricacies of roof bar selection and installation is crucial for Model Y owners. The vehicle’s distinctive all-glass roof design requires specific mounting solutions that protect the delicate structure whilst providing secure attachment points. Moreover, the aerodynamic implications of roof bar installation directly impact the vehicle’s efficiency and range, making informed choice essential for maintaining optimal performance.
Tesla model Y factory roof rail system specifications and compatibility
Tesla engineered the Model Y with an integrated roof rail system that accommodates aftermarket roof bars whilst preserving the vehicle’s structural integrity. The factory system incorporates four precisely positioned mounting points, strategically located to distribute loads effectively across the vehicle’s frame rather than the glass roof surface. These mounting points feature T-slot compatibility, allowing for secure attachment of various roof bar systems without compromising the vehicle’s weatherproofing.
The factory specification includes pre-marked arrow indicators on the glass roof, positioned at exact distances from the vehicle’s edges. The front mounting points are located 227mm from the front edge of the glass roof, whilst the rear points are positioned 412mm from the rear edge. This precise positioning ensures optimal weight distribution and maintains the vehicle’s centre of gravity within acceptable parameters for safe handling dynamics.
Tesla’s mounting system incorporates rubber sealing mechanisms that protect against water ingress whilst providing flexible accommodation for different roof bar designs. The factory T-slot receivers are manufactured from high-strength aluminium alloy, capable of supporting the maximum recommended dynamic load of 75kg when properly distributed across both front and rear mounting points. This specification aligns with European safety standards whilst accommodating the unique requirements of electric vehicle applications.
Premium tesla model Y roof bar solutions: thule, yakima and OEM options
The aftermarket roof bar landscape offers several premium solutions specifically designed for Tesla Model Y applications. Each manufacturer brings distinct advantages in terms of aerodynamic performance, load capacity, and integration with Tesla’s factory mounting system. Understanding these differences enables informed decision-making based on specific usage requirements and performance priorities.
Thule WingBar evo black edition aerodynamic performance analysis
The Thule WingBar Evo represents the pinnacle of aerodynamic roof bar design, featuring a distinctive wing-shaped profile that significantly reduces wind noise and drag coefficient impact. Independent testing demonstrates that the WingBar Evo generates approximately 15% less drag compared to traditional round or square profile bars, translating to reduced range impact for electric vehicle applications. The bar’s asymmetric design channels airflow smoothly over its surface, minimising turbulence and associated noise generation.
Thule’s proprietary mounting system integrates seamlessly with Tesla’s factory T-slots, utilising a tool-free installation mechanism that prevents over-tightening damage to the vehicle’s mounting points. The WingBar Evo’s aluminium construction provides exceptional strength-to-weight ratio, with each bar weighing just 2.1kg whilst supporting dynamic loads up to 100kg when properly configured. The black anodised finish complements the Model Y’s sophisticated aesthetic whilst providing superior corrosion resistance.
Yakima CoreBar Load-Bearing capacity for tesla model Y applications
Yakima’s CoreBar system prioritises maximum load-bearing capacity whilst maintaining reasonable aerodynamic performance. The CoreBar’s tubular steel construction provides exceptional strength, supporting dynamic loads up to 165kg when properly distributed across the roof system. This enhanced capacity makes the CoreBar particularly suitable for heavy-duty applications such as roof-top tents, large cargo boxes, or multiple bicycle carriers.
The CoreBar system incorporates Yakima’s StreamLine mounting mechanism, featuring precision-engineered clamps that distribute clamping forces evenly across Tesla’s factory mounting points. This design prevents stress concentration that could potentially damage the vehicle’s mounting system whilst ensuring secure attachment under dynamic loading conditions. The bars feature a powder-
coated finish that resists corrosion from road salt, moisture, and UV exposure, making it a robust long-term solution for frequent outdoor use. Whilst the bars themselves are over-engineered for strength, you must still respect the Model Y’s factory dynamic roof load limit of 75kg, which becomes the governing factor in real-world applications. For owners planning to carry a roof-top tent, it’s essential to calculate the combined weight of the tent, mounting hardware, and any additional gear to ensure compliance with Tesla’s recommendations. In practice, the Yakima CoreBar system offers an excellent balance between durability and cost, particularly for users who prioritise rugged functionality over the absolute lowest aerodynamic drag.
Integration with Tesla Model Y roof bars is further enhanced by Yakima’s extensive accessory ecosystem, including bike racks, kayak carriers, and large-volume cargo boxes. This modular approach allows you to configure your roof system for different seasons or sports without replacing the core bars and mounts. If you frequently switch between skiing, cycling, and camping setups, the CoreBar platform can offer a flexible base that adapts to changing needs. You benefit from a single, proven interface at the roof, with accessory swaps taking only a few minutes once you are familiar with the system.
Tesla OEM roof bars t-slot integration and weight distribution
Tesla’s OEM roof bars are engineered specifically for the Model Y and are optimised to integrate perfectly with the factory T-slot mounting points. The OEM crossbars feature a low-profile, slightly curved design that follows the contour of the glass roof, helping to minimise aerodynamic disruption and wind noise. Their integrated T-slot channels allow you to attach compatible accessories using sliding T-bolts, which distribute clamping forces more evenly than traditional wrap-around clamps. This design ensures that loads are transferred efficiently into the vehicle’s metal structure rather than placing undue stress on the glass.
The OEM system is rated to the same 75kg dynamic load limit as the factory mounting points, but its geometry and contact footprint are carefully tuned to optimise weight distribution. When you secure a cargo box or bike rack using the T-slots, the forces are spread over a greater surface area along the bar, reducing pressure on any single point. This is particularly important for high-speed motorway driving, where lateral forces from crosswinds and emergency manoeuvres can generate significant additional loads. For many owners who prefer a factory look and a plug-and-play experience, Tesla’s OEM roof bars represent a safe, well-tested solution with minimal guesswork.
Rhino-rack vortex RLT600 cross-country touring specifications
The Rhino-Rack Vortex RLT600 system is targeted at drivers who undertake regular long-distance touring or overland-style adventures with their Tesla Model Y. The Vortex crossbars use an aerodynamic, rubberised top surface that reduces wind noise and provides additional grip for soft loads such as surfboards or stand-up paddleboards. The RLT600 legs feature a robust quick-release mechanism, allowing you to remove the entire roof bar assembly without tools when it is not needed. This is particularly valuable if you wish to maximise efficiency during daily commuting and only mount the bars for weekend trips.
From a technical perspective, the Vortex RLT600 system is designed to handle demanding duty cycles, with UV-stable materials, stainless steel hardware, and a modular leg design that mates cleanly with Tesla’s T-slot points via vehicle-specific fitting kits. Although the bars themselves can support high loads, you must again observe the Model Y’s 75kg dynamic rating as the controlling limit. For cross-country touring, the RLT600’s emphasis on stability and ease of removal can significantly improve user experience: you enjoy a secure platform for bikes, skis, or cargo boxes on the road, then restore your Model Y to its most efficient form in a matter of minutes once you return home.
Tesla model Y roof bar load calculations and safety parameters
Understanding how much weight you can safely carry on Tesla Model Y roof bars is critical to both safety and vehicle performance. The official 75kg dynamic load limit includes the combined weight of the crossbars, mounting hardware, and all cargo or accessories attached to them. Exceeding this rating can compromise handling, increase stopping distances, and place excessive stress on the mounting points, particularly during sudden manoeuvres. To avoid these risks, you should perform basic load calculations before every trip, especially when carrying mixed loads such as bikes and a cargo box simultaneously.
It is also important to differentiate between static and dynamic load scenarios when planning how to use your Tesla roof bars. Static loads, such as when the vehicle is parked and supporting a roof-top tent, can safely be higher than dynamic loads because they are not subject to acceleration, braking, or cornering forces. However, Tesla’s documentation focuses on dynamic limits because they govern on-road safety. As a rule of thumb, treat the 75kg rating as an absolute maximum in motion and build in a safety margin of 10–20% when possible, particularly for long journeys or rough road conditions.
Dynamic load rating versus static load capacity for electric vehicle applications
Dynamic load rating describes the maximum weight the roof system can safely support while the vehicle is moving, taking into account acceleration, braking, cornering, and road irregularities. When you drive over a pothole or brake sharply, the effective forces on the roof bars can briefly spike to several times the static weight of the load. This is why the dynamic rating of 75kg for the Tesla Model Y is significantly lower than what the same structure could support when stationary. Think of it like standing in a lift: your weight does not change, but when the lift starts or stops, you momentarily feel heavier or lighter as forces increase or decrease.
Static load capacity, by contrast, refers to the maximum weight the vehicle roof can support when parked, which is particularly relevant for owners considering roof-top tents. Many aftermarket roof bar manufacturers suggest that, structurally, the roof and rack system can support two to three times the dynamic rating when the car is stationary. However, because Tesla does not publish an official static limit for the Model Y, you should approach roof-top tent installations conservatively. When in doubt, select lightweight tents and distribute occupants’ weight evenly; never exceed the combined dynamic rating when driving to your campsite.
Centre of gravity impact on tesla model Y handling dynamics
Adding weight to your Tesla Model Y roof bars inevitably raises the vehicle’s centre of gravity, which in turn affects handling and stability. Even modest loads such as bikes or a small cargo box can noticeably change body roll in fast corners or during evasive manoeuvres. From a physics standpoint, you can imagine the car as a lever: the higher you place the weight, the more leverage it has to tip the vehicle during lateral acceleration. Electric SUVs already carry a heavy battery pack low in the chassis, which helps counteract this effect, but you should still drive with additional caution when the roof is loaded.
To minimise adverse handling impacts, concentrate the heaviest items in the boot and use the roof for bulky but relatively light gear whenever possible. When you must transport heavier items up top, position them centrally between the crossbars and avoid offsetting loads to one side, which can create asymmetric handling characteristics. Reducing your cruising speed slightly and increasing following distances will further mitigate the increased stopping distances and body roll associated with a higher centre of gravity. By treating a loaded roof as a signal to adopt a more conservative driving style, you maintain both safety and passenger comfort on longer journeys.
Aerodynamic drag coefficient changes with roof bar configuration
The bare Tesla Model Y is engineered with a low drag coefficient, typically quoted around 0.23–0.24 depending on trim, to maximise efficiency and electric range. Installing roof bars alters the airflow over the roofline, increasing the effective drag coefficient and therefore the energy required to maintain a given speed. The extent of this change depends heavily on the crossbar profile, with modern aerodynamic bars such as the Thule WingBar Evo or Rhino-Rack Vortex generally performing significantly better than older square or round designs. In independent tests on similar-sized SUVs, well-designed aero bars have been shown to reduce drag penalties by 10–20% compared with traditional bars.
Configuration also plays a major role in drag. Two empty crossbars will increase drag less than a fully loaded roof box or a set of upright-mounted bicycles, which act almost like sails in the airflow. If you frequently drive at motorway speeds, even a small increase in drag can translate into noticeable energy consumption over hundreds of kilometres. Therefore, we recommend removing the crossbars when not in use, or at least dismantling large accessories like cargo boxes and bike racks between trips. Treat the roof system as you would winter tyres: install it when needed, then revert to the most efficient configuration for daily driving.
Battery range reduction analysis with loaded roof systems
For Tesla Model Y owners, perhaps the most pressing question is: how much will roof bars and cargo reduce my range? Real-world reports and test data from similar EVs suggest that empty aerodynamic roof bars may reduce range by around 2–5% at typical motorway speeds. When you add a large cargo box or multiple bikes, range reductions of 10–20% are not uncommon, particularly above 110 km/h (around 70 mph), where aerodynamic drag rises steeply. As a simple analogy, pushing your hand through water is easy at slow speed, but it becomes far harder as you move faster; air behaves in a similar way at high speeds.
To minimise range loss, combine several strategies: choose low-profile, aerodynamic bars and accessories, keep heavy gear inside the cabin when possible, and moderate your cruising speed. Dropping from 130 km/h to 110 km/h can significantly offset the additional drag from a loaded roof, often recovering a meaningful portion of lost range. In planning long trips, consider preconditioning and optimising your Supercharger stops to account for a modest reduction in efficiency. By incorporating roof bar usage into your charging strategy, you can maintain a smooth travel experience even on extended road trips with a fully loaded roof system.
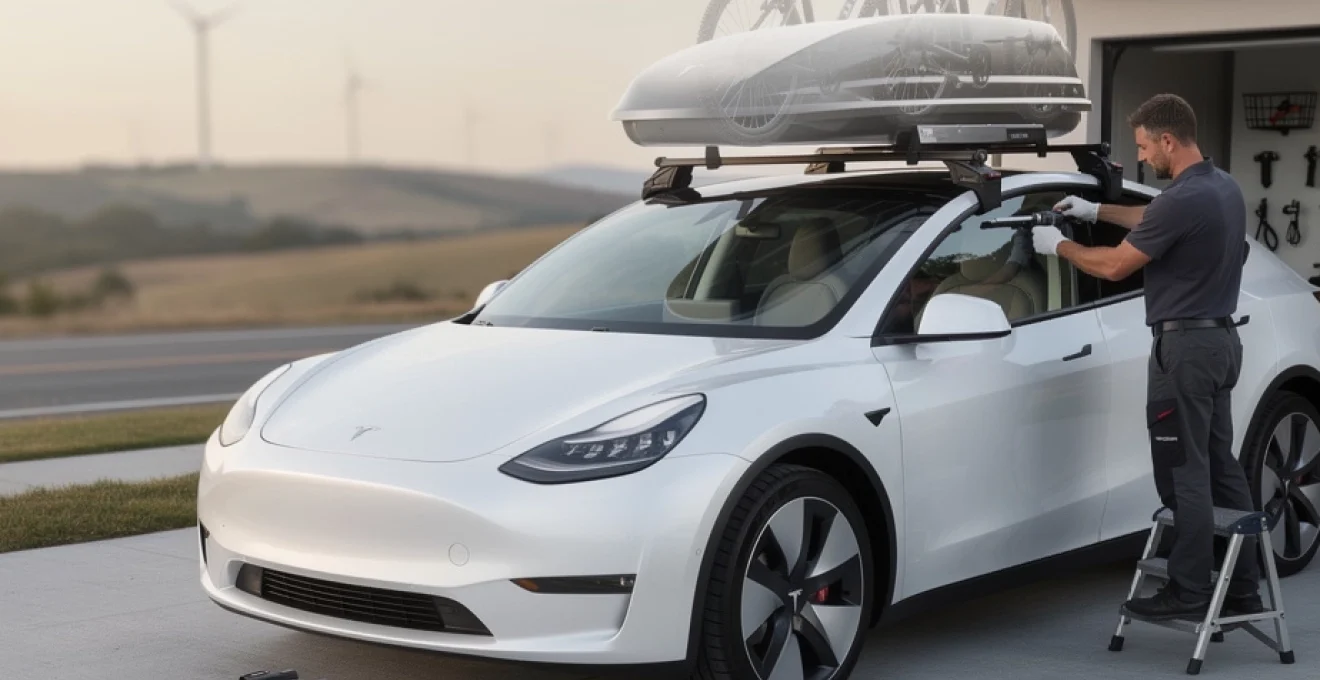
Step-by-step tesla model Y roof bar installation process
Installing roof bars on the Tesla Model Y may seem intimidating due to the all-glass roof, but the factory T-slot mounting system actually makes the process straightforward when you follow the correct procedure. The key is to prepare the contact surfaces carefully, align with Tesla’s pre-marked arrows, and tighten all fasteners to the specified torque values. Whether you are fitting Tesla OEM roof bars, Thule WingBars, Yakima CoreBars, or Rhino-Rack Vortex bars, the underlying installation principles remain largely the same. By working methodically and taking your time, you can complete the installation in under an hour, even if it is your first attempt.
Before you begin, gather all required tools and components, including the crossbars, mounting feet or towers, rubber pads, anti-abrasion tape, and any supplied torque wrenches or hex keys. Having a second person to help lift and align the bars greatly reduces the risk of accidental contact with the glass and improves safety. If you are installing the system for the first time, it is worth reading the manufacturer’s instructions in full and watching any available installation videos. This preparation helps you anticipate each step and avoid common mistakes such as misaligned clips or uneven bar spacing.
Factory t-slot access point preparation and rubber seal protection
The first phase of installation focuses on preparing the Model Y’s roof and exposing the factory T-slot access points safely. Start by thoroughly cleaning the roof glass and the black trim area around the four arrow indicators using a non-abrasive automotive glass cleaner. Any trapped dust or grit can scratch the surface when you apply anti-abrasion tape or position the rubber pads, so this step is essential for long-term cosmetic protection. Once cleaned, allow the surface to dry completely to ensure that the protective tape adheres correctly.
Next, identify the precise arrow markings on the glass that denote the front and rear mounting positions: 227mm from the front edge for the front mounts and 412mm from the rear edge for the rear mounts. Most quality roof bar kits include pre-cut anti-abrasion strips that must be aligned with these arrows and the trim line; carefully match the arrow on the tape or pad with the arrow on the glass before pressing into place. Using a plastic clip tool or trim tool, gently lift the rubber seal at each arrow location to reveal the underlying metal receiver. Slide the metal clip or adapter into position beneath the seal, ensuring it engages firmly in the receiver without pinching or deforming the rubber.
Torque specification requirements for tesla model Y mounting points
Once the clips or adapters are properly seated, you can position the mounting feet or towers over each attachment point and begin securing them with the provided hardware. At this stage, correct torque application is crucial: under-tightening may allow the assembly to shift under load, while over-tightening could stress the mounting points or, in the worst case, contribute to glass damage. Many Tesla-compatible roof bar systems specify a tightening range of around 2.5–3.5 Nm for the primary fasteners, though you should always follow the exact values given in your kit’s instructions. A small preset torque wrench or torque-limiting tool, often supplied with premium systems, helps you achieve consistent results.
Begin by hand-tightening each fastener until you feel the mounting foot seat evenly on the roof surface, then use the torque tool to bring each side up to the specified value gradually. It is best to alternate between sides in a cross pattern, much like tightening wheel nuts, to ensure even clamping pressure. After reaching the target torque, check that the indicator marks on the knobs or bolts (if provided) align with the corresponding marks on the towers, confirming a locked position. As a final verification, gently pull and push each tower in multiple directions; there should be no meaningful movement or rattling once properly tightened.
Cross-bar spacing optimisation for different cargo types
With the mounting feet secure, you can now position the front and rear crossbars, taking care to use the correct bar in each position (the front bar is often slightly longer). Slide the bars into the towers or attach them using the specified clamps, but do not fully tighten until you have adjusted the spacing. Optimal cross-bar spacing depends on the type of cargo you intend to carry: for example, long items like kayaks and surfboards benefit from wider spacing to reduce overhang and improve stability, whereas short cargo boxes and some bike racks may specify minimum and maximum distances between bars.
As a guideline, start by centring both bars on the roof so that the overhang is equal on the left and right sides, then measure the distance between the front and rear bars. Many cargo box manufacturers recommend spacing in the region of 70–90cm, but you should confirm the exact range in your accessory’s manual. If you plan to carry multiple accessory types, choose a bar spacing that falls within the acceptable range for all of them, or be prepared to adjust the spacing when switching between configurations. Once satisfied, tighten the bar-to-tower interface to the recommended torque, again alternating sides to maintain even pressure.
Post-installation safety testing and load security verification
Before loading any gear, it is vital to conduct a thorough post-installation safety check of your Tesla Model Y roof bars. Walk around the vehicle and visually confirm that all pads, anti-abrasion strips, and rubber seals sit flush, with no trapped debris or obvious misalignment. Gently tug each tower and crossbar in multiple directions to ensure there is no movement relative to the roof. If your system includes locking covers or keyed knobs, engage all locks and check that the keys remove smoothly, indicating the mechanisms are properly seated.
On your first drive after installation, start with a short, low-speed trip and listen for unusual noises such as rattling, whistling, or creaking. These sounds can indicate loose fasteners, misaligned bars, or accessories that are vibrating in the airflow. After 10–20km of driving, stop and recheck all fasteners, particularly if carrying a significant load; this “bedding in” inspection helps catch any minor settling before longer journeys. Only once you are confident in the stability and security of the system should you embark on sustained high-speed or long-distance travel with loaded roof bars.
Tesla model Y roof bar accessory integration and cargo solutions
One of the main reasons to invest in Tesla Model Y roof bars is the wide range of compatible accessories that dramatically extend the vehicle’s utility. From streamlined cargo boxes for skiing holidays to dedicated racks for bikes, kayaks, and surfboards, modern roof systems are designed as modular platforms. Thanks to universal T-slot channels and standardised clamp designs, you can mix and match brands in many cases, provided you respect weight limits and follow compatibility guidelines. This flexibility allows you to tailor your setup to specific trips, whether it is a family road holiday, a mountain biking weekend, or a surfing expedition.
Cargo boxes are particularly popular for Model Y owners who want to transport bulky yet relatively light items such as winter clothing, camping equipment, or children’s gear without sacrificing cabin comfort. Aerodynamic, low-profile cargo boxes minimise additional drag and wind noise, and many feature dual-side opening for easy access on either side of the car. Bike carriers can be mounted upright on the roof bars or on a rear-mounted hitch; roof-mounted solutions free up the rear of the vehicle but do increase overall height, which you must remember when entering car parks or garages. Water-sports carriers with padded cradles or J-style mounts protect kayaks and boards whilst providing secure tie-down points that prevent lateral movement.
When integrating accessories, pay attention to the manufacturer’s recommended mounting positions and tie-down procedures. For example, long kayaks should be secured at both the bow and stern using straps or ropes attached to recovery points at the front and rear of the car, reducing the load on the roof bars in crosswinds. Soft straps with padded buckles help prevent cosmetic damage to both cargo and vehicle surfaces. If you are using multiple accessories simultaneously—such as two bikes and a compact cargo box—plan your layout carefully so that doors can still open fully and the boot can lift without contacting the rear of a box or rack. A quick dry-run fitting in your driveway often reveals small clearance issues you can resolve before departure.
Maintenance protocols and troubleshooting tesla model Y roof bar systems
Proper maintenance of your Tesla Model Y roof bars ensures long-term safety, protects the glass roof, and preserves the appearance of both the bars and the vehicle. After trips in rain, snow, or salty winter conditions, rinse the bars, towers, and surrounding roof area with clean water to remove corrosive residues. Periodically remove the bars entirely to wash and inspect the anti-abrasion strips and rubber pads, checking for trapped dirt that could act like sandpaper over time. Lightly lubricate moving parts such as locks and adjustment mechanisms with a suitable non-staining lubricant, taking care to avoid overspray onto the glass.
Routine inspection should also include checking all bolts and clamps for correct torque, especially after long journeys on rough roads or with near-maximum loads. Look for signs of wear such as frayed straps, cracked plastic components, or excessive play in hinges and quick-release levers; replacing small parts early is far cheaper than dealing with a failed component on the motorway. If you hear new noises from the roof area, treat them as an early warning sign rather than an annoyance: investigate promptly to identify loose hardware, misaligned accessories, or damaged pads. In many cases, simply re-tensioning straps or repositioning a bar by a few millimetres can eliminate whistles and vibrations.
Common troubleshooting scenarios include difficulty engaging or disengaging locks, water droplets emerging near mounting points after heavy rain, or bars that appear slightly skewed when viewed from the front. For stiff locks, first check that no dirt or ice is obstructing the keyway, then apply a small amount of lock-safe lubricant and operate the mechanism several times. Minor water ingress around rubber seals may indicate that the seal was pinched during installation; loosening the tower, reseating the seal, and then re-torquing often resolves the issue. If the crossbars look misaligned, measure overhang on both sides and adjust until they are symmetrical; this not only improves aesthetics but can also reduce wind noise and uneven loading.
Finally, if you change roof bar brands or upgrade from an entry-level system to a premium aerodynamic kit, take the opportunity to inspect the underlying T-slot receivers and glass edges for any signs of previous abrasion or damage. Addressing small cosmetic issues early—such as polishing minor scuffs or replacing worn anti-abrasion tape—helps maintain the resale value of your Tesla Model Y. By combining careful installation, thoughtful accessory integration, and regular maintenance, you can enjoy the full benefits of roof bars whilst safeguarding both range and safety on every journey.